Appendix 2: Documentation Authoring Guide
About this guide
Who is this guide for?
This guide is intended for parties interested in contributing to this documentation.
What is it about?
This guide describes a recommended workflow and required conventions to be used when creating content.
Workflow
Setup Environment
While the online editor may be used, the most efficient way to create documentation is to install the GitBook Toolchain locally. See https://toolchain.gitbook.com/ for detailed instructions. The short version follows.
Install
gitbook-cliusing npm:$ npm install gitbook-cli -gClone the mdEditor GitBook:
$ git clone git@github.com:adiwg/mdEditor-doc.gitor
$ git clone https://github.com/adiwg/mdEditor-doc.gitSetup GitBook
 $ cd mdEditor-doc
 $ gitbook install
Start the local GitBook server
$ gitbook serve- Open a browser to: http://localhost:4000
Contributing using GitHub
Fork this repository (click "fork" on the repository's home page in GitHub)
Clone the forked repository with git clone <your fork's url> and create a
branch with git checkout -b some-branch-name.
As you make commits, reference the issue number, if any, in your commit message, such as
git commit -m "added information on important subject (#62)"
Once you're at the point that you'd like feedback, submit a Pull Request (new
Pull Request button). Choose master for the base and your branch name for compare,
then submit it!
Your PR will be reviewed by another contributor, and then either merged or have changes requested.
Style Guide
This section covers styling conventions required for this documentations. Some of the conventions rely on plug-ins that enhance the native GitBook Markdown functionality. In some instances, the effects of the plugins are not displayed until after the book has been generated.
Headings
Please use headings to define page sections. Heading levels should appear sequentially without gaps (don't skip heading levels). Headings should start at Level 1 for the page title. Headings should not be used purely to define font styles - if absolutely necessary, use CSS for that. Following this convention will make it possible to parse the markdown programmatically, e.g. to dynamically create a table of contents.
Lists
Ordered lists
Ordered lists are processed irrespective of the actual number assigned to each list item. For Example:
1. first
2. second
3. third
- first
- second
- third
is rendered the same as:
1. first
12. twelfth
30. thirtieth
- first
- twelfth
- thirtieth
Therefore, one recommended convention is to use 1. for every item in an ordered
list. This makes it easier to insert or remove items from the list, at the
expense of slightly less readable Markdown. If you choose to sequentially order
the list items, you must make sure the numbers are sequential to avoid confusion.
List headings
Headings may be use in lists. However, special handling is required to ensure bullets for ordered lists are styled appropriately.
The tasks tag is available for styling "task lists". For simplicity, all of the various heading levels are styled the same.
Example without task tag

1. ## Level 2
1. ### Level 3
1. ###### Level 6
Example without task tag
Level 2
Level 3
Level 6
Example with task tag

<!-- tasks -->
1. ## Level 2
1. ### Level 3
1. ###### Level 6
<!-- endtasks -->
Example with task tag
Level 2
Level 3
Level 6
Icons
FontAwesome icons are available. Use an
<i> tag to render the chosen icon.
<i class="fa fa-smile-o"> </i> Happy Birthday <i class="fa fa-birthday-cake"> </i>
Happy Birthday
Buttons
Bootstrap 3 style buttons are supported. Use a <span> tag since these are
for documentation only. Icons may be combined with buttons.
Default Primary Success Info Extra - Small Warning - Small Danger - Large Link
<!-- Standard button -->
<span class="btn btn-default">Default</span>

<!-- Provides extra visual weight and identifies the primary action in a set of buttons -->
<span class="btn btn-primary">Primary</span>

<!-- Indicates a successful or positive action -->
<span class="btn btn-success"><i class="fa fa-check"> </i> Success</span>

<!-- Contextual button for informational alert messages -->
<span class="btn btn-info btn-xs">Info Extra - Small</span>

<!-- Indicates caution should be taken with this action -->
<span class="btn btn-warning btn-sm">Warning - Small</span>

<!-- Indicates a dangerous or potentially negative action -->
<span class="btn btn-danger btn-lg">Danger - Large</span>

<!-- Deemphasize a button by making it look like a link while maintaining button behavior -->
<span class="btn btn-link">Link</span>
Hints
Styled hint blocks are supported.
{% hint style='info' %}
Important info: this note needs to be highlighted
{% endhint %}
There are five supported variations.
info(default)tipdangerworkingplain
Info: this note needs to be highlighted.
Tip: 20% is customary.
Danger: this is going to blow up!
Working: for the man every night and day...
Plain: booooooorrrrring.
User Interface Elements
The following classes may be used to highlight text that refers to elements of the user interface:
<span class="md-window">window</span>
<span class="md-section">section</span>
<span class="md-panel">panel</span>
<span class="md-element">element</span>
Window Part Edit Window Section Panel Name panel element
Screenshots
The following software is required:
- Libre Office Draw
- A tool to capture screenshots
- Windows, Linux, Unix, or Mac OS X
Types of screenshots
- basic screenshots have no annotation or markup applied
- annotated screenshots have markup applied, e.g. callouts, highlights, etc.
Requirements for all screenshots
- Minimum 1200px wide
- Must include a caption
- PNG format
Generally browser window captures should only contain minimum user interface controls, without navigation toolbar, tab bar, bookmarks toolbar, or status bar. See Bookmarlet for Screenshots.

Image 1: Example browser screenshot. Images should be stored in the
assetsdirectory corresponding to the section in which the image appears. Exceptions to this requirement are made for images used in multiple sections.- Image sizes should be as small as possible without sacrificing quality. Usually significant size reduction can be achieved by color-type or bit-depth reduction. pngcrush is a good tool for this.
Requirements for annotated screenshots
- Use LibreOffice Draw to create the annotations
- A template is available here
/assets/documentation-guide/callouts-template.odg - Each screenshot should be placed on a new page
- Whenever possible place annotations in callouts outside of the image or in a way that does not cover user interface elements
- Export only the image by
- selecting all content on the LibreOffice Draw page using cntl-A
- choose 'Export ...' from the file menu
- select 'PNG' from the 'Format' drop-down selection list
- check the 'Selection' box on the Export window
- click the 'Save' button
- set the pixels width to 1200
- choose a compression level of 6
- click the 'OK' button
- A template is available here
- All annotated screenshots for a section should be stored on separate pages in a single
.odgfile. Save the LibreOffice Draw file (.odg) in the same directory as the screenshots
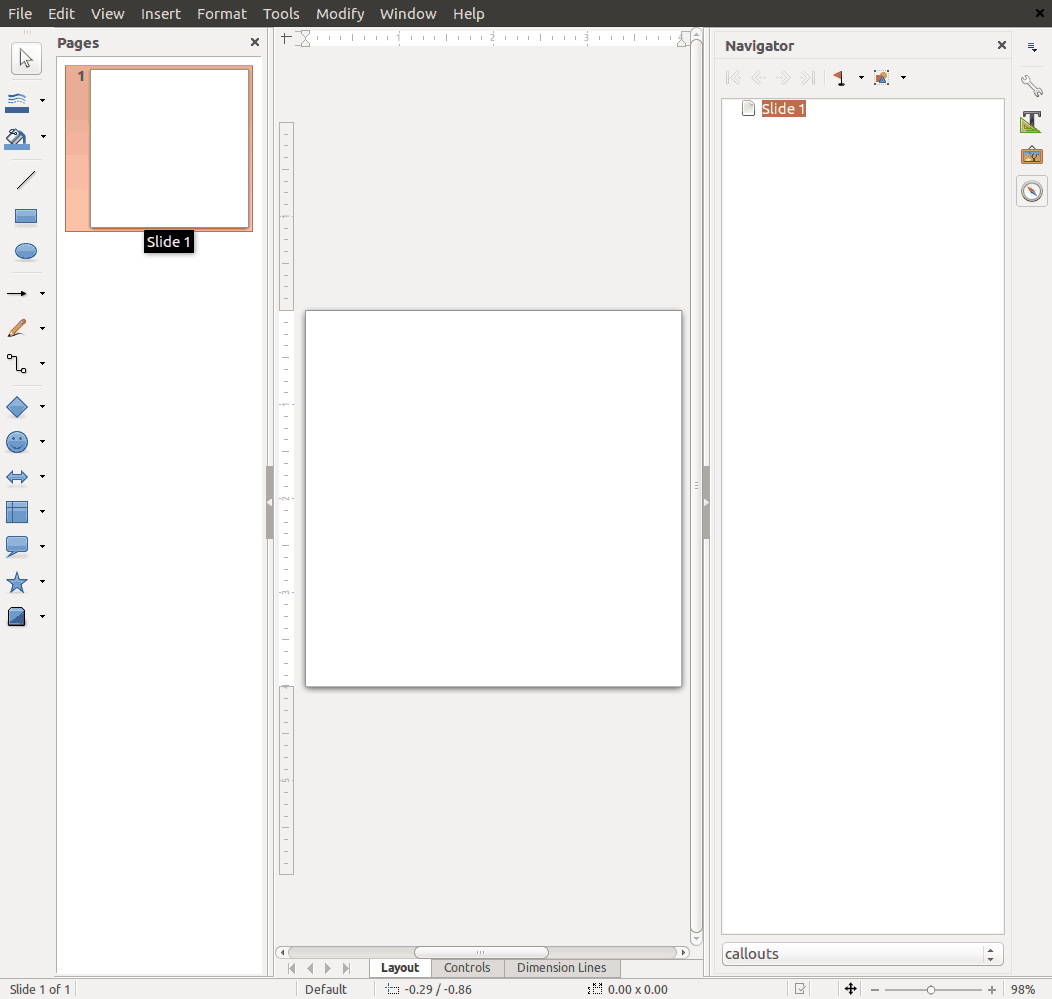
Image 2: Creating screenshots using LibreOffice Draw
Screenshot captions
To apply a caption to a screenshot use this syntax in the Markdown.
{caption}

To apply a border to a screenshot, add class=border.
{caption class=border}
Applying the {caption} to a image will also indent the image from the surrounding text.
Bookmarlet for Screenshots
Use this bookmarlet: Plain Window. Drag the link to your bookmarks bar or create a bookmark with the code below. Clicking the bookmark will open the current webpage in a plain window that is 1200px wide. Re-size to needed height and take a screenshot. More about bookmarlets here: https://www.wikipedia.org/wiki/Bookmarklet.
javascript:(function(){var windowObjectReference;var strWindowFeatures='menubar=no,location=yes,resizable=yes,scrollbars=yes,status=no,width=1200,height=1200';windowObjectReference=window.open(window.location.href,'Plain Window',strWindowFeatures);})();